MOTIVE EDITOR.
Table of Contents
Previous
Next
Figure 1.
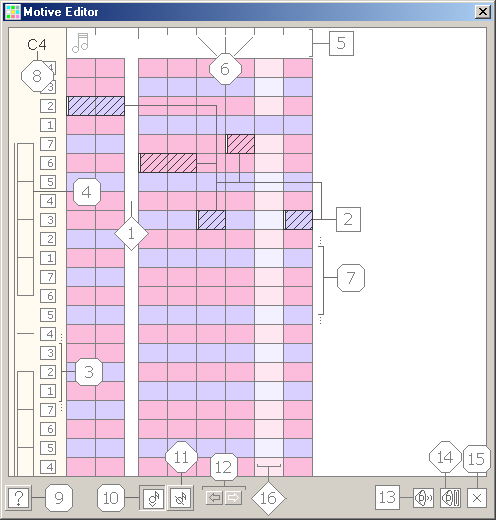
The table below describes each control item on Figure 1.
 |
This area separates the measures of the Motive. |
 |
The current notes of the Motive are shown as the stroked rectangles. |
 |
The digits on the left-hand-side of the editor show the correspondence
between pitch of a note and a scale degree. |
 |
This area displays the note being edited on the stave with the Treble/Bass
clef. |
 |
This area of the editor allows you to listen to a composed Motive in
the 'step-by-step' mode. |
 |
The lines in the header of the editor mark each sixteenth beat. |
 |
The auxiliary grid of the editor. The horizontal lines denote the pitch.
The vertical lines denote the each sixteenth beat. A pitch that belongs
to the non-chord tones has a red background. A pitch that belongs to the
chord tones has blue background. |
 |
The name and the octave of the current note. |
 |
Press this button to invoke the help window. |
 |
This button switches on the 'edit' mode. The 'edit' mode allows you
to insert notes, move notes and change note duration. |
 |
This button switches on the 'delete' mode. This mode allows you to delete
notes. |
 |
The buttons of the 'undo/redo' mechanism. The editor remembers the last
twenty states of a Motive. The 'Piano Roll undo/redo' mechanism does not
relate to the 'undo/redo' mechanism of the Motive being edited. |
 |
Press this button to listen to the Motive. |
 |
Press this button to listen the previous Motive and the current Motive. |
 |
This button closes the window of the editor. |
 |
This mask prompts that some non-chord tones should be resolved to a
chord tone. The editor uses the following rules to compute the mask: The
Motive can begin with either a chord or non-chord note. If the non-chord
note is located in the up-beat or in the Motive start, on the next step
it should smoothly resolve into the chord note. If the non-chord note is
taken by a leap, on the next step it should smoothly resolve into the chord
note. The non-chord note may follow another non-chord note if the interval
between the first non-chord note and a previous chord note is second. The
second non-chord note should smoothly resolve into the chord note. |
How to invoke the 'Piano Roll'.
Just click the mouse button on the top part of the interface element that represents
the Motive.
How to insert a note.
Make sure that the 'edit' mode (see number
on Figure 1) is selected.
Move the mouse cursor to the appropriate time and pitch and press the mouse button.
Specify the duration of a note by the movement of the mouse cursor to the right.
Release the mouse button.
How to change note pitch and note time.
Make sure that the 'edit' mode (see number
on Figure 1) is selected.
Move the mouse cursor to a note. Press the mouse button and drag the selected note
to a new position. You can change pitch and time of a note. Release the mouse button.
How to change the duration of a note.
Make sure that the 'edit' mode (see number
on Figure 1) is selected.
Move the mouse cursor to the outermost right part of the rectangle that represents
the note. Press the mouse button. Specify the new note duration by the horizontal
movement of the mouse cursor.
How to delete a note.
Make sure that the 'delete' mode (see number
on Figure 1) is selected.
Move the mouse cursor to a note and press the mouse button. This action deletes
the note. If you want to delete one more note then do not release the mouse button
and just move the mouse cursor to another note.
How to listen the Motive in the 'step-by-step' mode.
Move the mouse cursor to the area that is marked by number
on the figure 1 and press
the mouse button. The editor plays the corresponding note and chord. Do not release
the mouse button, move the mouse cursor to the right. The editor plays a next note.
And so on.
Table of Contents
Previous
Next
Copyright (c) 2003 - 2005 Ilya Schepikhin. All rights reserved.
|